Follow Me On Social Media!


Red Velvet Layer Cake Recipe: Irresistibly Decadent Delight
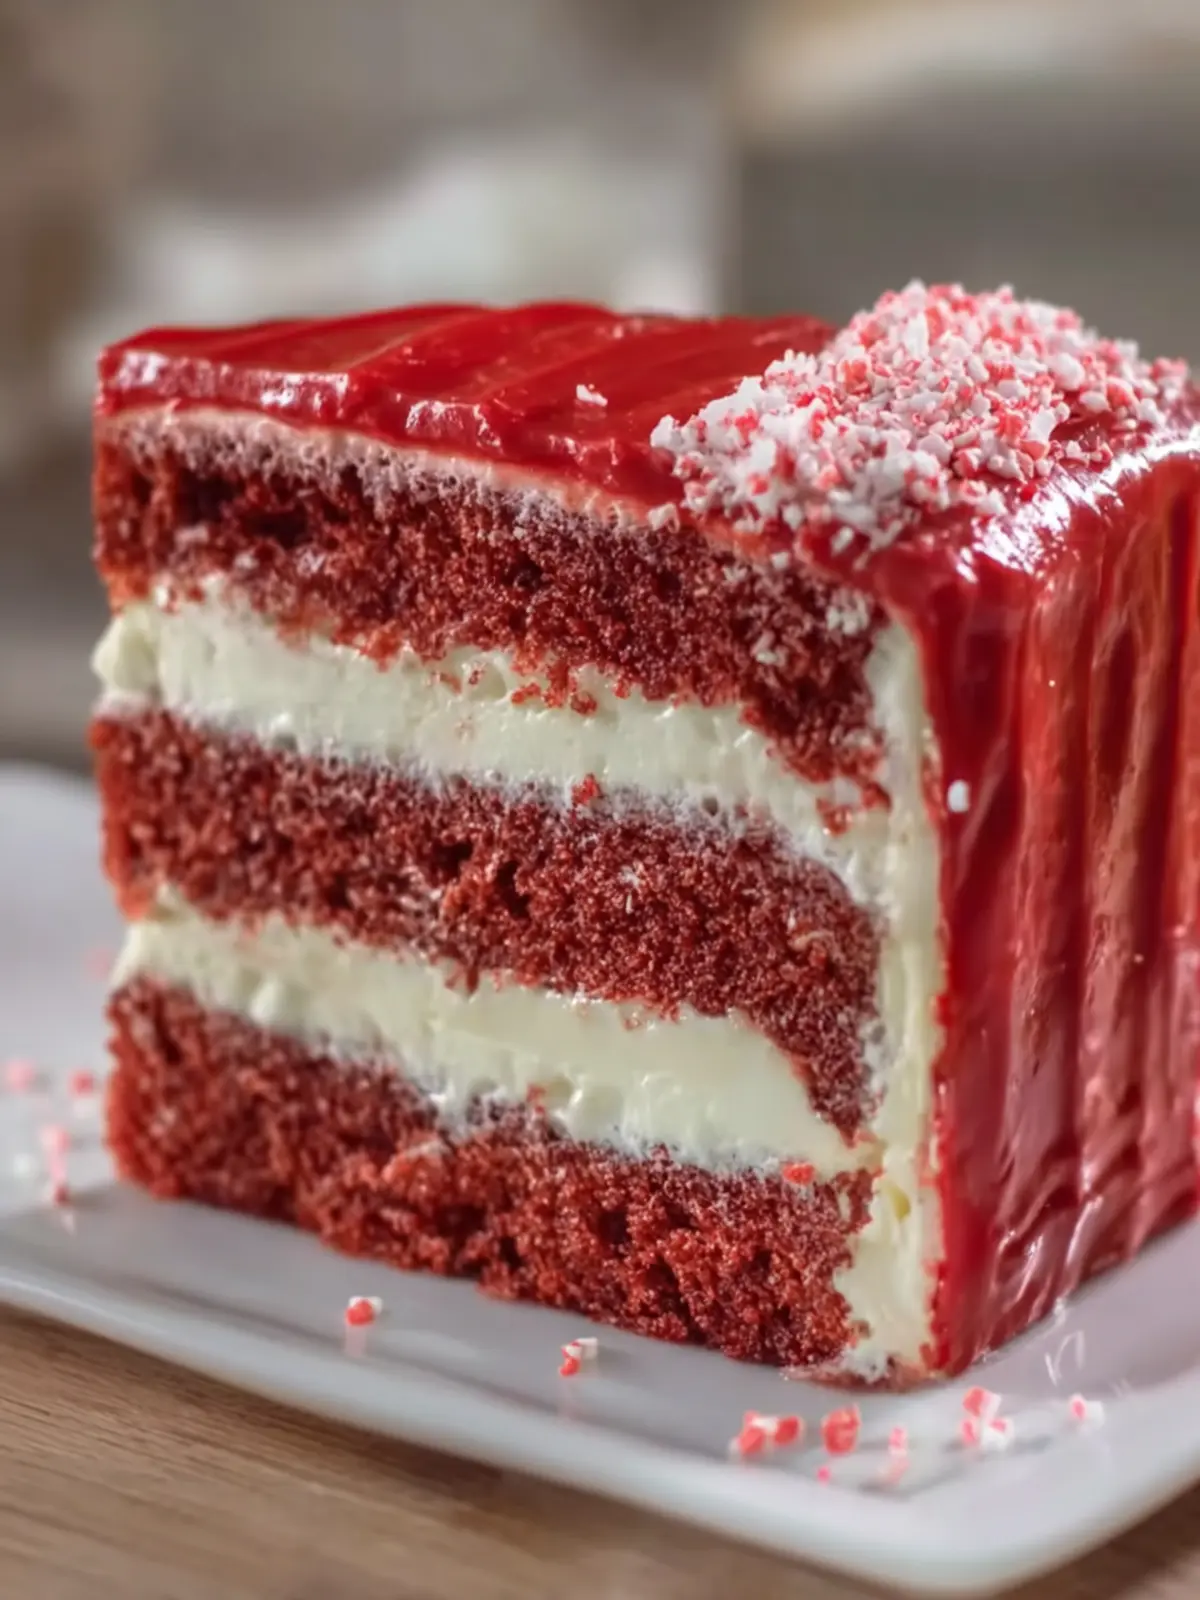
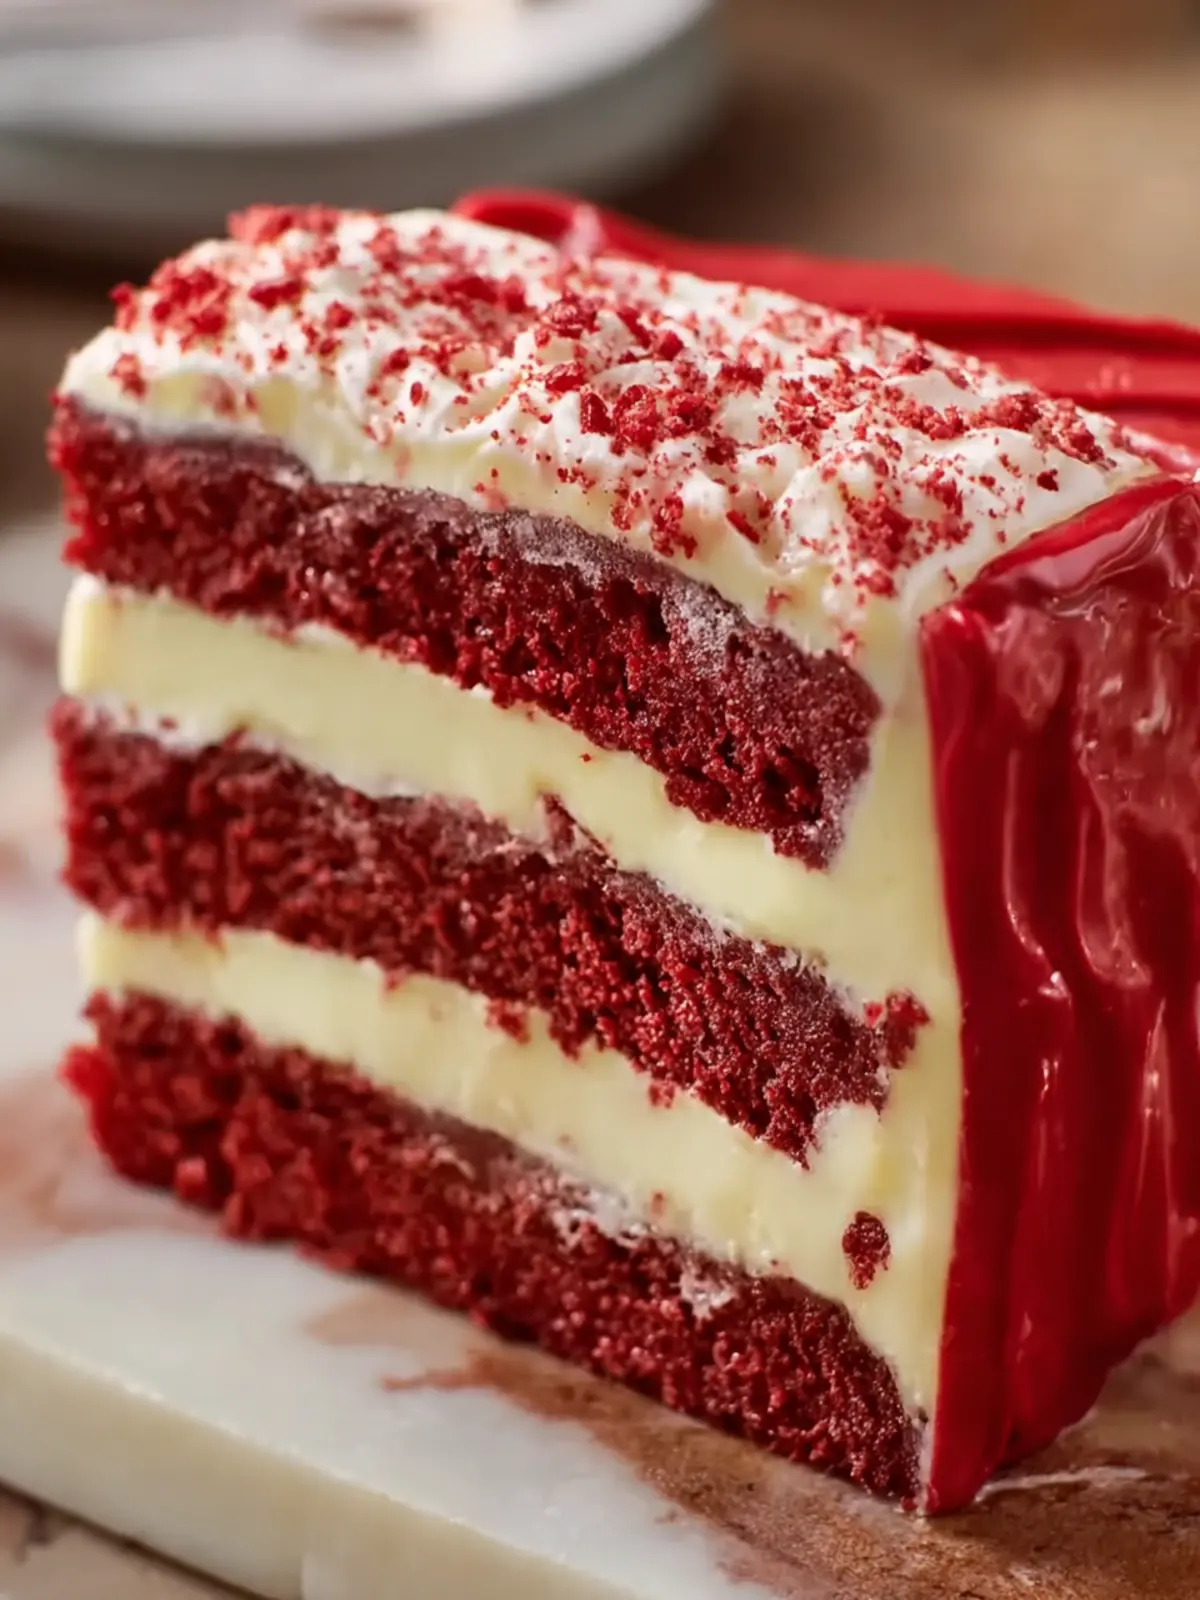
Introduction to Red Velvet Layer Cake Recipe
Imagine yourself at a cozy bakery, surrounded by the irresistible scent of freshly baked treats. Among the delicate pastries and colorful confections, your eyes land on a stunning red velvet layer cake—an iconic masterpiece that’s as delicious as it is beautiful. This red velvet layer cake recipe brings together the classic vanilla flavor, a hint of cocoa, and an undeniable touch of elegance that has cemented its place in dessert history.
What makes Red Velvet Cake a classic? The uniqueness of this cake lies not only in its striking red color but also in its velvety texture and rich flavor. Traditionally, red velvet cake is made with cocoa powder and buttermilk, which provide moisture and a tender crumb. The addition of vinegar enhances the cake’s flavor profile and contributes to that coveted soft texture. Topped with a luscious cream cheese frosting, each slice erupts with a creamy tang that perfectly balances the sweetness of the cake.
Beyond its exquisite taste, red velvet cake has a storied past that adds to its allure. Originating in the 19th century, it gained widespread popularity during the mid-20th century, particularly in the American South. It was once considered a “special occasion” cake, gracing tables at weddings, birthdays, and festive gatherings. Today, it remains a beloved staple, with countless variants and adaptations highlighting its versatility.
In this blog, we’ll walk through an exquisite red velvet layer cake recipe that’s perfect for your next celebration or quiet afternoon at home. Whether you’re an experienced baker or just starting, this recipe is designed to be approachable and rewarding. So, grab your mixing bowls and preheat your oven—let’s dive into making a cake that’s not just food but a heartfelt experience worth sharing with friends and family. The joy of baking and savoring a slice of red velvet is just a few steps away!

Key Ingredients for Red Velvet Layer Cake
Crafting the perfect red velvet layer cake is all about the right balance of flavors and textures. Each component plays a crucial role in creating that classic, rich experience that makes this cake a standout at any celebration.
Cake Flour: The foundation of our cake, I prefer using cake flour for its fine texture, which results in a lighter crumb. It provides that delicate bite that red velvet cakes are known for. If you can’t find cake flour, a substitute can be made by mixing all-purpose flour with a little cornstarch.
Cocoa Powder: A touch of unsweetened cocoa powder gives the cake its distinctive color and a hint of chocolate flavor. Be sure to choose high-quality cocoa for the best taste.
Vegetable Oil: While some recipes call for butter, I find vegetable oil keeps the cake wonderfully moist. It also allows for a better rise, softening the cake and giving it that dreamy texture.
Buttermilk: The tanginess of buttermilk provides balance and helps to create a tender cake. If you’re short on buttermilk, you can easily substitute it with milk mixed with a teaspoon of vinegar or lemon juice.
Red Food Coloring: To achieve that iconic red hue, I always opt for liquid food coloring. It gives the cake a vibrant color without altering the taste.
Each of these ingredients plays a significant role in the red velvet layer cake recipe that will surely impress your friends and family at your next gathering.
Why You’ll Love This Red Velvet Layer Cake
There’s an undeniable magic that surrounds the red velvet layer cake recipe. It’s a dessert that turns any occasion—from birthdays to casual get-togethers—into a celebration filled with rich flavors and vibrant colors. I still remember the first time I tasted this eye-catching cake at a friend’s wedding. The moment I took a bite, that perfect blend of chocolate and vanilla, combined with a velvety texture, instantly captured my heart.
A Classic with a Twist
Unlike your typical chocolate cake, this red velvet masterpiece offers a subtle cocoa flavor, paired with a tangy cream cheese frosting that creates an irresistible contrast. It’s both decadent and light, making it a balanced treat that’s just right for any palate.
Perfect for Any Occasion
Whether you’re attending a holiday gathering, hosting a dinner party, or simply treating yourself, this cake shines in versatility. Its stunning layers look impressive on any table setting, sparking joy and enticing everyone to grab a slice.
If you’ve ever felt intimidated by baking, you’ll find that this red velvet layer cake recipe is both approachable and rewarding. With straightforward instructions and a few essential ingredients, you’ll create a dessert that will have your friends and family raving. So, roll up your sleeves, and let’s get started on this delightful journey to cake perfection!
Tips for Making the Perfect Red Velvet Layer Cake
Creating the ideal red velvet layer cake is a delightful journey, one filled with color, flavor, and a sprinkle of love. As you embark on this baking adventure, keep these thoughtful tips in mind to ensure your cake turns out wonderfully.
Choose the Right Red Dye
For that captivating, deep red hue, use gel food coloring instead of liquid. Gel coloring delivers a richer color without altering the batter’s consistency, making your red velvet layer cake recipe construction all the more durable.
Sift Your Dry Ingredients
Ensure your flour and cocoa powder are sifted to achieve a lighter and fluffier texture. This simple step helps avoid lumps and makes for a melt-in-your-mouth cake.
Don’t Rush the Butter and Sugar Creaming
Take your time creaming the butter and sugar. Aim for a light and airy mix; this step introduces air into the batter, which is key to achieving the perfect rise and moisture.
Monitor Your Baking Time
Ovens can be temperamental, so keep an eye on your cake as it bakes. Insert a toothpick in the center—when it comes out clean or with a few moist crumbs, your cakes are ready to be pulled from the oven.
Use Fresh Ingredients for Frosting
For a delicious cream cheese frosting, ensure your cream cheese and butter are at room temperature. This helps in achieving a smooth and creamy texture that complements your beautifully layered cake.
With these tips, your red velvet layer cake will not only please the eyes but also become the star of any gathering. Happy baking!
Time Details for Red Velvet Layer Cake
Making a perfect red velvet layer cake can be a delightful journey in the kitchen, and understanding the timing is crucial to success.
Preparation time
To get everything ready, you’ll need about 20-25 minutes. This includes measuring your ingredients, mixing your batter, and preparing your cake pans.
Baking time
Once your batter is mixed and poured into pans, it’s time for the oven! Bake the layers for approximately 25-30 minutes until they’re beautifully set and a toothpick comes out clean.
Total time
In total, you’re looking at around 1 hour (including both prep and bake time) before you can indulge in your delicious red velvet layer cake. It’s definitely worth every minute spent!
Nutritional Information for Red Velvet Layer Cake
When diving into the delicious richness of a red velvet layer cake, understanding its nutritional profile can help you enjoy every bite while making mindful choices.
Calories
A typical slice of this red velvet layer cake contains around 350 calories. This delightful indulgence is ideal for celebrations but balancing it with your daily intake is always a good plan.
Protein
You’ll find about 5 grams of protein per slice, thanks to ingredients like eggs and dairy in the cake’s batter. While it may not replace your protein sources, it’s a sweet addition to your meal.
Sodium
The sodium content is roughly 250 milligrams per slice. This is relatively moderate, but if you’re watching your salt intake, it’s worth considering how this fits into your overall diet.
Enjoying a slice of red velvet layer cake can be a fun treat, and now you can savor it with a little extra knowledge!
FAQs about Red Velvet Layer Cake
At the heart of every festive celebration, the Red Velvet Layer Cake serves as more than just a dessert; it’s a delicious symbol of joy and indulgence that captures the imagination. Whether you’re celebrating a birthday or just enjoying a cozy night in, this cake has a unique way of elevating any occasion. Let’s dive into some frequently asked questions to help you master this classic treat!
How can I ensure my Red Velvet Cake turns out moist?
To achieve that perfectly moist texture in your Red Velvet Layer Cake recipe, be sure to:
- Use buttermilk: It reacts with baking soda, adding tenderness and acidity that creates a velvety crumb.
- Incorporate oil instead of all butter: Oil retains moisture better, ensuring your cake stays fresh longer.
- Avoid overmixing: Gently blend your wet and dry ingredients just until combined, as overmixing can lead to a dense cake.
Can I make this cake in advance?
Absolutely! You can bake your Red Velvet Layers a day or two in advance. Simply allow the layers to cool completely, wrap them tightly in plastic wrap, and store them in the refrigerator. Just remember to frost the cake right before serving to maintain that beautiful finish.
What are some good frosting options for Red Velvet Cake?
While cream cheese frosting is the classic pairing for this cake, you can explore various options like:
- Buttercream: A simple vanilla or chocolate buttercream adds a rich layer of sweetness.
- Whipped cream frosting: This lighter, airy choice balances the cake’s density beautifully.
- Ganache: For an indulgent twist, a chocolate ganache is a decadent option that compliments the cake’s flavors perfectly.
With these tips and tricks in hand, you’ll be well on your way to creating a show-stopping Red Velvet Layer Cake! Happy baking!
Conclusion on Red Velvet Layer Cake
The red velvet layer cake recipe inspires both novice and seasoned bakers alike, transforming a simple gathering into a celebration. With its striking red color and luscious cream cheese frosting, this cake isn’t just a treat for the taste buds but also a feast for the eyes. As you slice through those tender layers, remember that your effort in the kitchen has created something truly special. Whether you’re marking a birthday or a random Tuesday, sharing this delightful dessert with friends and family will surely create sweet memories. So, roll up your sleeves, get baking, and indulge in the rich flavors and vibrant colors of your very own red velvet masterpiece!
Print
Red Velvet Layer Cake
- Total Time: 1 hour
- Yield: 12-14 servings 1x
Description
Deliciously rich and moist red velvet layer cake with cream cheese frosting.
Ingredients
Scale
- 2 ½ cups all-purpose flour
- 1 ½ cups granulated sugar
- 1 teaspoon baking soda
- 1 teaspoon cocoa powder
- 1 teaspoon salt
- 2 large eggs
- 1 cup buttermilk
- 1 ½ cups vegetable oil
- 1 teaspoon vanilla extract
- 1 teaspoon distilled white vinegar
- 2 tablespoons red food coloring
- 1 cup unsalted butter, softened (for frosting)
- 4 cups powdered sugar (for frosting)
- 16 oz cream cheese, softened (for frosting)
- 1 teaspoon vanilla extract (for frosting)
Instructions
- Preheat Oven: Preheat your oven to 350°F (175°C). Grease and flour three 8-inch round cake pans.
- Mix Dry Ingredients: In a medium bowl, sift together the flour, sugar, baking soda, cocoa powder, and salt.
- Combine Wet Ingredients: In a large bowl, beat the eggs. Add buttermilk, vegetable oil, vanilla extract, vinegar, and red food coloring. Mix until well combined.
- Combine All Ingredients: Slowly add the dry ingredients to the wet ingredients, mixing on medium speed until everything is smooth and combined.
- Bake the Cake: Divide the batter evenly among the prepared cake pans. Bake for 25-30 minutes, or until a toothpick inserted into the center comes out clean.
- Cool the Cakes: Allow the cakes to cool in the pans for 10 minutes, then remove them to finish cooling on a wire rack.
- Make the Frosting: In a large bowl, beat the cream cheese and butter until smooth. Gradually add the powdered sugar, beating until light and fluffy. Stir in vanilla extract.
- Assemble the Cake: Place one layer of cake on a serving platter. Spread frosting over the top. Repeat with the second and third layers. Spread frosting on the top and sides of the cake.
- Chill and Serve: Refrigerate the cake for at least 30 minutes before serving to set the frosting.
Notes
- Ensure Ingredients are at Room Temperature: This helps them to mix more smoothly.
- Use Gel Food Coloring: For a more vibrant red color, consider using gel food coloring instead of liquid.
- Frosting Variations: Add a tablespoon of lemon juice to the frosting for a tangy contrast.
- Cake Texture: For a moist cake, be careful not to overmix the batter once the dry ingredients are added.
- Prep Time: 30 minutes
- Cook Time: 30 minutes
- Category: Dessert
- Method: Baking
- Cuisine: American
Nutrition
- Serving Size: 1 slice
- Calories: 400
- Sugar: 35g
- Sodium: 250mg
- Fat: 20g
- Saturated Fat: 10g
- Unsaturated Fat: 8g
- Trans Fat: 0g
- Carbohydrates: 50g
- Fiber: 1g
- Protein: 5g
- Cholesterol: 60mg